IoT Kits

IoT Kits© are easy to build and are a great introduction to the Internet of Things (IoT), sensors, and microcontrollers. To build a kit, you should have:

  • an intermediate level of soldering skill,
  • the ability to install software on a personal computer,
  • familiarity with basic text editing (cut & paste), and file manipulation (unzipping files, moving folders),
  • Wi-Fi and access to the Internet, and
  • some basic tools (soldering iron, wire cutters, hot melt glue gun , and screwdriver).

For more about the Internet of Things see https://en.wikipedia.org/wiki/Internet_of_things

Note for kits purchased after July 2022:

The latest kits are pre-programmed! All you need to do is assemble the kit and configure it using a cell phone or Wi-Fi connected PC. You do not need to install the Arduino IDE or project firmware. We are still updating the website, with the latest configuration instructions, meanwhile, the hardware assembly instructions are correct for all projects. Go to these sections for complete assembly and configuration instructions:

Available IoT Kits:

Solar-powered, wireless weather station (single-board version)

The D1M-WX1 is a completely wireless, solar-powered weather station using your Wi-Fi for connection to the Internet. It reports barometric pressure, temperature, humidity, and light intensity to ThingSpeak, a free Internet of Things service. Licensed radio amateurs can also post data to APRS-IS.

You can view your data anywhere in the world that has Internet access and you can choose to make your data private or public. My backyard station has been online since 2016: https://thingspeak.com/channels/286120

The dimensions of the printed circuit board are 83 x 40 mm (3.25 x 1.6 inches). The solar panel is 80 x 55 mm (3.1 x 2.15 inches). Total weight with LiPo cell and solar panel is approximately 60 g (2.1 oz).

Single Board Weather Station

Solar-powered, wireless weather station – Stacked Version

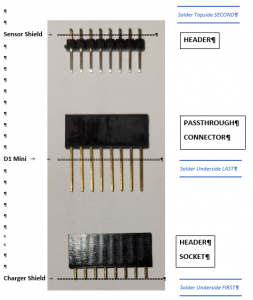
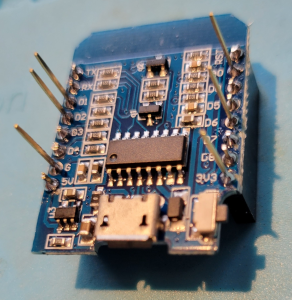
The D1S-WX1 stacked version has the same functions as the single-board kit above in a different format. It consists of three printed circuit boards: 1) LiPo charger, 2) D1 Mini microcontroller, and 3) sensor board.

The dimensions of the assembled stack are 26 wide x 47 deep x 42 mm high (1.0 x 1.85 x 1.65 inches). The solar panel is 80 x 55 mm (3.1 x 2.15 inches). Total weight with LiPo cell and solar panel is approximately 54 g (1.8 oz).

Weather Display Kit

The D1S-Display is provided as a stand-alone kit showing your local weather obtained from WeatherBit.io. and indoor temperature and humidity. This is an excellent kit for first-time kit builders. Contruction is simple and quick. Soldering is easy and no programming is required.

In addition to weather information, it displays accurate local and Universal Coordinated Time (UTC) obtained from a Net Time Protocol Server and it automatically adjusts for Daylight Saving Time.

The kit comes with an attractive 3D printed case The display is a full color, 1-inch (25 mm) square TFT device.

Features:

  • Obtains localized weather information from WeatherBit.io
  • Shows current conditions and daily maximum/minimum
  • Includes wind speed and direction, precipitation type, probability and amount, pressure, temperature, humidity, cloud cover
  • Built in sensor for indoor temperature and humidity
  • User can choose metric and imperial units
  • Precise time provided by National Institute of Standards and Technology (NIST)
  • Displays Universal Coordinated Time (UTC) and your local time.
  • Daylight saving time is automatically determined
  • Almanac for local sunrise and sunset times and moon phase

As a remote display for the IoT Kit’s weather stations:

The D1S-Display can also be programmed as a companion kit for the solar-powered weather stations. It receives data from your weather station either through Thingspeak for non-hams or APRS-IS for licensed hams. The data is shown on frames that rotate in sequence  1) an analog clock showing local time, 2) a digital clock with local and UTC times, 3) weather, and 4) telemetry data from your D1M-WX1 kit.

General Assembly Instructions for All Kits

Follow these instructions step-by-step to order and build a kit. Click on the section title for the complete text.

Permanent link to this article: https://w4krl.com/iot-kits/

1. Order an IoT Kit

To order a kit, send e-mail to: Include the following information in your e-mail: The kit names and/or numbers The quantity of each kit desired Your name Your address (International buyers, please avoid abbreviations for streets and neighborhoods) Your e-mail address Optional: Your callsign if you are a licensed radio amateur You will receive an …

Flush cutters

2. Suggested Tools

Here are some suggested tools for new kit builders. If you’ve built kits before you probably have all these tools. Most are inexpensive tools that you will use again if you do any electronics work. Soldering iron or soldering station with good quality rosin-core solder. A 30-watt iron is satisfactory. It should have a conical …

3. Open a ThingSpeak account

ThingSpeak is a free Internet of Things service that stores and displays data received from your weather station. ThingSpeak integrates support for MATLAB software from MathWorks, allowing you to analyze and visualize your station’s data using MATLAB without requiring the purchase of a MATLAB license. A ThingSpeak account is needed for the weather stations kits. It is …

Arduino IDE Tools/Board

4. Prepare the Arduino IDE

You may skip this section if you have purchased a preprogrammed kit. The Arduino IDE is an easy-to-use C++ compiler specially adapted to programming Arduino-compatible microcontrollers. You do not actually need to know how to program because all the IoT Kits software is ready-to-run. The IDE will upload the IoT Kits firmware to the microcontroller used in the kits. …

5. Download IoT Kits Firmware

You may skip this section if you have purchased a preprogrammed kit. All IoT Kits firmware is hosted on GitHub. Download the entire package and then use the particular sketch appropriate for your kit. There are detailed instructions for downloading and choosing the firmware on the GitHub page. GitHub Link for all IoT Kits: https://github.com/W4KRL/IoT-Kits-Firmware …

6A. Assemble Single Board Solar-Powered Weather Station

Hardware Assembly Start by placing screws and spacers in all four corners of the board. The spacers should be on the underside (non-component) side of the board. This makes the pcb into its own work station. Assemble the board starting with the lowest components and work up. Solder each one-by-one. Carefully inspect your solder joints …

6B. Assemble Stacked Version Solar Powered Weather Station

Hardware Assembly Stacked Shield Version Use the photos as guides. The orientation of the breakout sensor boards and LiPo cell connections are critically important. Use good quality small gauge rosin-core solder. Keep the iron tip clean and tinned. Solar Charger Shield D1S-LiSo Assemble the board starting with the lowest components and working up. Resistor R1 …

6C. Assemble Remote Display

Features: This is an easy to build kit for someone learning to solder. All parts are included and it is pre-programmed. The kit obtains and displays current and forecasted weather for your location from WeatherBit.io Wind speed and direction, precipitation type, probability and amount, barometric pressure, temperature, humidity, cloud cover and more are displayed A …

7A. Weather Station Software Configuration – Preprogrammed

Weather station kits purchased after July 2022 are preprogrammed. They are configured using a cell phone or W-Fi connected computer. These instructions are for a cell phone to configure either the single board or stacked version of the weather stations. The same method can be used with a Wi‑Fi connected computer. You must be familiar …

7B. Weather Station Firmware Configuration – Manually Programmed

You may skip this step if you have purchased a preprogrammed kit. Configuration of ThingSpeak_config.h All weather station sketches need a ThingSpeak_config.h file. It must be located in the same folder as the sketch XXX.ino file. Open the sketch in the Arduino IDE. Select the ThingSpeak_config.h or appropriate tab and edit the information for your station as indicated by the comments …

8. How IoT Kits Work

The D1M-WX1 and D1S-WX1 IoT Weather Stations use an ESP8266 System on Chip microcontroller to read and interpret weather data from sensors, format the data so that it is understandable by online services, and transmit the data to the Internet over Wi-Fi. The unit is completely solar-powered. A lithium polymer cell maintains operation in darkness. …

9. MATLAB Scripts

The ThingSpeak Internet of Things platform provides free access to the powerful MATLAB programming environment. MATLAB scripts let you visualize, analyze, and manipulate data from your ThingSpeak channel. Some scripts used on my ThingSpeak channel are listed below. You can add these visualizations to your ThingSpeak channel by entering your channel ID and API Read …